
This is the top choice of other clients acquiring items related to brine tank for dummies. For additional choices, take a look at our full recomendations of Brine Tank For Dummies or use the search box.
Table of Contents
- 1 Brine Shrimp Hatchery Dish (Eggs Sold Separately.)
- 2 Brine Shrimp Hatchery Dish + 3 Months Supply of Brine Shrimp Eggs
- 3 San Francisco Bay Brand Brine Shrimp Hatchery Kit, Includes 3-Packets of Brine Shrimp Hatch Mix
- 4 PRO+AQUA RV Water Filter and Portable Water Softener Regeneration Kit - 5 Micron Filtration, Anti-Corrosion Brass Fittings, Transparent Housing, Filters Chlorine, Bad Taste, Odors, Sediment, Bacteria
- 5 Brine Shrimp Hatchery Kits brine Shrimp Eggs Incubator Hatchery brine Shrimp Eggs Incubator Artemia Hatchery with Silver air Pump
- 6 Clack COMIN16JU002616 60014 2310 Brine Salt Tank Safety Float, Grey and Black
- 7 Brine Shrimp Hatchery Incubator Kit Brine Shrimp Hatchery Dish, Efficient and Easy Brine Shrimp Hatchery Collect with Brine Shrimp Net, Measuring Cup, Brine Shrimp Eggs Spoon, Shrimp Dropper
- 8 Fleck 60014 2310 Brine Tank Safety Shut Off Valve, 3/8", Black
- 9 NestBasics Brine Shrimp Hatchery Kits brine Shrimp Eggs Incubator Hatchery brine Shrimp Eggs Incubator Artemia Hatchery kit Machine
- 10 Water Softener Salt Brine Tank 11x11x38 Inches With Safety Float By American Water Solutions
Brine Shrimp Hatchery Dish (Eggs Sold Separately.)
- Easy to Use
- No Aeration or Additional Equipment Needed
- Perfec For Small Volume Hatching Needs - Yields over 100,000 Baby Brine Shrimp in 24 Hours
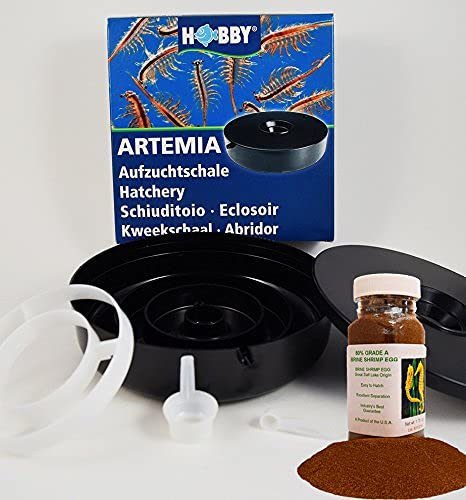
Brine Shrimp Hatchery Dish + 3 Months Supply of Brine Shrimp Eggs
- No aeration required
- Grade A (80% Hatch-Out) 1.75 oz ( 50 grams) Brine Shrimp Egg included with Purchase
- No siphoning required
- Ideal for small volume (1/2 gram) hatching needs
- Yields about 100,000 nauplii in 24 hours under ideal conditions

San Francisco Bay Brand Brine Shrimp Hatchery Kit, Includes 3-Packets of Brine Shrimp Hatch Mix
- Kit for hatching brine shrimp eggs
- Easy to set up, use, and clean
- It can be used again and again
- Budget-friendly
- Baby brine shrimp are an excellent food for baby fish (fry), small fish, reef aquariums, and others
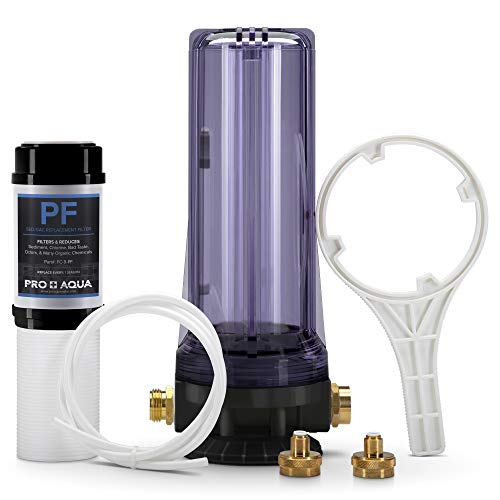
PRO+AQUA RV Water Filter and Portable Water Softener Regeneration Kit - 5 Micron Filtration, Anti-Corrosion Brass Fittings, Transparent Housing, Filters Chlorine, Bad Taste, Odors, Sediment, Bacteria
- Easy to use: No electricity or special tools required. 3/4” garden hose connection fittings to easily connect to any feed water. High-quality brass fittings for long-lasting reliability and durability. Uses a PA-DC replaceable 2 stage filter and provides a clear view of filter condition as well as the brine solution during regeneration. Pro-grade o-rings and rubber washers are used to prevent leaks. Housing threads pre-lubed with silicone grease to make it easy to remove and reinstall.
- Double Filtration: The WS-P-REG-KIT is a Dual Stage water filter that is capable of eliminating particles that are 20 times smaller than human hair such as dirt, rust, and sediment. Also, the second stage 2nd stage is made out of Coconut Granulated Active Carbon, which can remove bad tastes and foul odors caused by chlorine and disinfection chemicals. Helps to extend resin life of the WS-P-16 Pro+Aqua Portable Water Softener or any other travel softener that utilizes 3/4” garden hose fittings.
- Universal Regen Kit: The WS-P-REG-KIT is the first of its kind for portable water softener regeneration systems. Easy to use and comes with components to make regeneration a breeze. Quick-connect fittings and brine hose come standard with the kit. Compatible with any Portable Water Softener that utilizes ¾” garden hose fittings. Reduce regeneration time in half over the traditional method of pouring salt through a tiny hole.
- True Regeneration: Outdated methods of pouring in salt through a tiny hole only to regenerate the top layer of resin is over. PA-REG-KIT works like a mini-brine tank, similar to a regular whole house water softener system. Simply pour 1-2lbs of table salt into the empty housing, tighten, connect a garden hose, attach to a portable water softener, turn on the hose and allow a pencil-sized stream to come out. 30-45 minutes later, the resin is fully regenerated and ready to use once again.
- Compatible: 100% compatible with portable water softener brands that are equipped with universal ¾” garden hose fittings. Filter campground source water to provide clean, sediment/chlorine-free water. When combined with a Portable Water Softener, clean-filtered soft water is achieved. Can be used as a stand-alone pre-filter by simply connecting a garden hose to one end of the base and the other to the RV/trailer directly. The filter is easy to remove when the included wrench is used.

Brine Shrimp Hatchery Kits brine Shrimp Eggs Incubator Hatchery brine Shrimp Eggs Incubator Artemia Hatchery with Silver air Pump
- The brine shrimp incubator contains:1pcs brine shrimp eggs incubator Hatchery,1pcs silver air pump with 1pcs black controller valve,1pcs check valve, 1pcs air stone,11.8 Inch long transparent aquarium tubing, 1 meter black airline ,one unit brine shrimp net colllector,two units automatic brine shrimp feeder for fish,three units Brine shrimp suction tube and six units Brine shrimp storage bottle
- There are two ways to install our brine shrimp hatcher machine.You can use the four suction cup of shrimp incubator to stick it to the tank glass inside or you wanna install it out of the tank glass then you can use the tripod to install out of the tank.
- The first way to provide oxygen to the brine shrimp incubator is to put the bubble stone in the incubator to provide oxygen. When the brine shrimp has hatched, open the trim valve at the bottom of the incubator to collect brine shrimp. Note that the direction of the inlet and outlet of the check valve must be installed correctly with the pipe, otherwise the air pump will not be able to discharge air.
- If you use the first way to install the brine shrimp incubator,Please remember to use a scissor to cut one piece small tubing like 0.5 Inch long in the product package to connect the gray acrylic tube and air stone and cut the other small tubing 0.5 Inch in the product package to connect the gray acrylic tube and lid.Please note that gray acrylic tube is not able to connect to air stone and lid directly,which need two small piece tubing to connect air stone and lid.
- The second way to provide oxygen to the brine shrimp from the bottom hole of the incubator. Please note the direction of the inlet and outlet of the check valve and the pipe must be installed correctly, otherwise the air pump will not be able to output air, and the trim valve needs to be opened. When the brine shrimp has hatched, first turn off the trim valve, then pull out the air pump tube from the trim valve, and then open the trim valve to start collecting brine shrimp

Clack COMIN16JU002616 60014 2310 Brine Salt Tank Safety Float, Grey and Black
- Complete float assembly for any fleck or Clack Water softener
- This is a complete float assembly for any Fleck or Clack water softener. Comes with the brine shut off valve, J-tube, and float bobber.

Brine Shrimp Hatchery Incubator Kit Brine Shrimp Hatchery Dish, Efficient and Easy Brine Shrimp Hatchery Collect with Brine Shrimp Net, Measuring Cup, Brine Shrimp Eggs Spoon, Shrimp Dropper
- the Brine Shrimp Incubator Contains: package includes 1 hatching box cover, 1 hatching box, 1 hatching ring, 1 floating ring, 1 shrimp net, 1 shrimp collecting cup, 1 rubber band sucker, 1 salt spoon, 1 brine shrimp eggs spoon and 2 brine shrimp collecting droppers; Nice combination meet your hatching demands
- Installation Method: you can use the suction cup to fix the hatching tray to float on the water surface of the tank, and then hatch the brine shrimp according to the steps shown in the picture; For specific steps, please refer to the picture on the homepage
- Nice Performance: this brine Shrimp hatchery dish does not need spotlight, not need provide oxygen, and brine shrimp will be automatically concentrated in the hatching circle in the center of the hatchery dish under the phototaxis characteristics
- Repeated Use: we provide a complete set of hatching tools to handle hatching work concisely and efficiently; Each tool can be applied again after hatching and washing, quality material will serve you for a long time
- Incubation Temperature: the incubation time of brine shrimp should be 24 hours; During incubation, the incubation temperature of brine shrimp should not exceed 30 degrees Celsius/ 86 degree Fahrenheit, and it is best to keep it at 26 -28 degrees Celsius/ 78. 8 - 82. 4 degree Fahrenheit

Fleck 60014 2310 Brine Tank Safety Shut Off Valve, 3/8", Black
- 2310 Safety Brine Valve
- Fleck 2310 Safety Brine Tank Valve Prevents Overfilling Of The Brine Tank. The Float Assembly Is Not Included
- The Brine Tank Safety Shut-Off Valve Has 3/8 Inch Connections On Both The Pick-Up Tube And Brine Line Connections
- Brand Name: Fleck

NestBasics Brine Shrimp Hatchery Kits brine Shrimp Eggs Incubator Hatchery brine Shrimp Eggs Incubator Artemia Hatchery kit Machine
- The brine shrimp hatchery kits product contains:one unit brine shrimp eggs incubator,one unit black USB plug air pump with one unit black controller valve,one unit check valve, one unit air stone,11.8 Inch long transparent aquarium tubing, 1 meter black airline ,one unit brine shrimp net colllector,two units automatic brine shrimp feeder for fish,three units Brine shrimp suction tube and six units Brine shrimp storage bottle
- Our brine shrimp incubator is designed professional for hatching brine shrimp eggs which comes with the whole set including air pump air stone and aquarium tubing. The main purpose of the small The USB air pump is for continue to hatching brine shrimp when the electricity is off and after the home is powered off, the The USB air pump can be connected to the power bank to continue hatching brine shrimp.
- There are two ways to install our brine shrimp hatcher machine.You can use the four suction cup of shrimp incubator to stick it to the tank glass inside or you wanna install it out of the tank glass then you can use the tripod to install out of the tank.
- The first way to provide oxygen to the brine shrimp incubator is to put the bubble stone in the incubator to provide oxygen. When the brine shrimp has hatched, open the trim valve at the bottom of the incubator to collect brine shrimp. Note that the direction of the inlet and outlet of the check valve must be installed correctly with the pipe, otherwise the air pump will not be able to discharge air.
- The second way to provide oxygen to the brine shrimp from the bottom hole of the incubator. Please note the direction of the inlet and outlet of the check valve and the pipe must be installed correctly, otherwise the air pump will not be able to output air, and the trim valve needs to be opened. When the brine shrimp has hatched, first turn off the trim valve, then pull out the air pump tube from the trim valve, and then open the trim valve to start collecting brine shrimp

Water Softener Salt Brine Tank 11x11x38 Inches With Safety Float By American Water Solutions
- 11" x 11" x 38" high
- Easy quick connect design for quick installation
- Complete brine tank with safety float assembly
Related Products:
- Septic Tank For Dummies
- Septic Tank Care For Dummies
- Shark Tank For Dummies
- Cleaning A Fish Tank For Dummies
- Cleaning Fish Tank For Dummies
- Fish Tank Cycling For Dummies
- Saltwater Tank Setup For Dummies
- Fish Tank Care For Dummies
- Cycling A Fish Tank For Dummies
- California Water Tank Regulations For Dummies
- Aquaponics Fish Tank For Dummies
- Additional Insured Definition For Dummies
- Rs232 For Dummies
- Eu For Dummies
- Being Gay For Dummies
Last update 2021-09-03. Price and product availability may change.