
This is basically the best selected item of other customers buying items related to articles about fundamental forces for dummies. For more choices, check out our list of Articles About Fundamental Forces For Dummies or use the search box.
Table of Contents
- 1 Goli Apple Cider Vinegar Gummy Vitamins - 60 Count - Vitamin B12, Gelatin-Free, Gluten-Free, Vegan & Non-GMO
- 2 Scotch PRO TL906 Thermal Laminator, 1 Laminating Machine, White/Blue, Laminate Holiday Crafts and Photos, For Holiday or School Supplies, 9 in.
- 3 Revlon Face Roller, Oily Skin Control for Face Makeup, Oil Absorbing, Volcanic Reusable Facial Skincare Tool for At-Home or On-the-Go Mini Massage
- 4 Archie McPhee Yodeling Pickle: A Musical Toy, Fun for All Ages, Great Gift, Hours of Mindless Entertainment
- 5 Osmo - Pizza Co. - Communication Skills & Math - Age 5 to 12 - Educational Learning Games - STEM Toy - Gifts for Kids, For iPhone, iPad or Fire Tablet, Age 5 6 7 8 9 10 11 12 (Osmo Base Required)
- 6 Learning Resources Anatomy Models Bundle Set, Brain, Body, Heart, Skeleton, Classroom Demonstration Tools, Teacher Accessories, Grades 8+, Ages 3+
- 7 Good Morning Merch Poster - Motivational Wall Art - Positive Inspirational Quotes Bathroom Wall Decor - Uplifting Encouragement Gifts for Women, Men
- 8 Funny Dish Towel, Sweet Dreams Are Made Of Cheese Who Am I To Dis A Brie? Flour Sack Kitchen Towel, Sweet Housewarming Gift, White
- 9 Accoutrements Bacon Strips Bandages
- 10 Currently Unsupervised Novelty Graphic Sarcastic Funny T Shirt XL Black
Goli Apple Cider Vinegar Gummy Vitamins - 60 Count - Vitamin B12, Gelatin-Free, Gluten-Free, Vegan & Non-GMO
- Vegan, Non-GMO, Gluten-free & Gelatin-free: Each bottle of Goli contains 60 delicious, vegan, non-gmo, gluten-free & gelatin-free Apple Cider Vinegar gummies, which makes them suitable for almost any lifestyle.
- Made in the USA with locally and globally sourced ingredients. Goli Gummies are made in allergen-free, cGMP certified facilities in the United States with local and globally sourced ingredients to ensure that our products are reputable and of the highest quality standards.
- Patented Formula, Essential Vitamins, Great Taste: Our patented formula contains essential Vitamin B12 to help support cellular energy production, immune function, heart health, healthy nutrient metabolism, a healthy nervous system and overall health and wellbeing. Apple Cider Vinegar has traditionally been used for digestion, gut health and appetite. Our unique flavor profile combined with essential vitamins makes Goli ACV Gummies a delicious addition to your daily health routine.
- Vitamin Angels: Goli is a proud supporter of Vitamin Angels
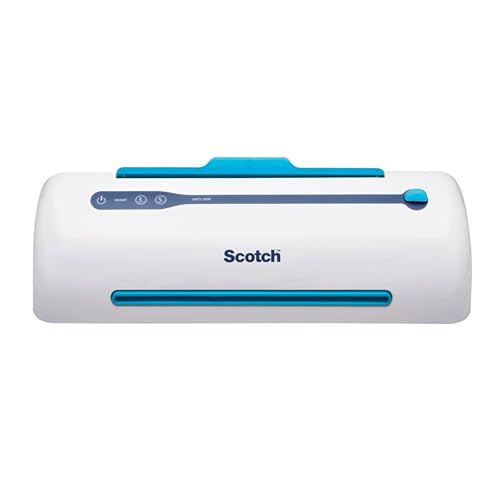
Scotch PRO TL906 Thermal Laminator, 1 Laminating Machine, White/Blue, Laminate Holiday Crafts and Photos, For Holiday or School Supplies, 9 in.
- LAMINATING MACHINE: One Scotch PRO TL906 Thermal Laminator to help you protect holiday crafts, photos and more up to 9 in. wide
- PROFESSIONAL FINISH: Two heated rollers with two temperature settings create bubble- and wrinkle-free results that give your documents, photos and more a high-quality, professional appearance
- FAST LAMINATING: Thermal laminating machine warms up in five to six minutes and laminates at a rate of 15 in. per minute to save you time during the busy holiday season
- IDEAL FOR: Ideal for creating marker-proof, tear-proof and spill-proof paper items, making this laminator machine a great addition to holiday and school supplies
- HOW TO USE: Use this thermal laminating machine to laminate photos, festive holiday signs and banners, Christmas gift tags, kids' holiday artwork and place cards for your holiday dinner table
- COMPACT LAMINATOR: Each package contains one Scotch Thermal Laminator that accepts both 3 mil and 5-mil pouches up to 9 in. wide
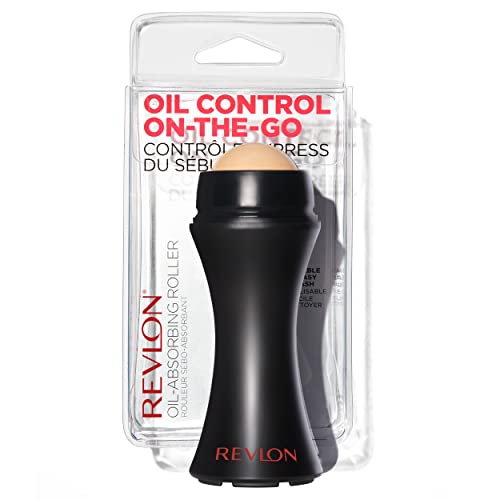
Revlon Face Roller, Oily Skin Control for Face Makeup, Oil Absorbing, Volcanic Reusable Facial Skincare Tool for At-Home or On-the-Go Mini Massage
- LIKE BLOTTING PAPERS, BUT BETTER: This face roller is made of real volcanic stone, which soaks up excess oil instantly. It’s our secret for fresh, shine-free skin any time. Use it on a clean or finished face—it won’t mess up your makeup
- MASSAGES AND MATTIFIES FACE: Rolling the stone roller across your skin feels heavenly, like a mini facial massage. Ditch your jade roller and use our 2-in-1 Mattifying face roller for oily and acne prone skin
- EASY TO USE: Gently roll the face roller ball over your T-zone or anywhere skin is shiny. That’s it
- LESS WASTE THAN BLOTTING PAPER: Unlike blotting papers for oily skin that are used once and thrown out, this oil-absorbing roller is reusable. To clean, twist the roller’s ring to unlock, and pull out the stone. Wash with a gentle cleanser, rinse, and air-dry before locking it back in
- LIVE BOLDLY WITH REVLON MAKEUP: Revlon has the quality beauty tools and high-pigment, the bold color makeup you need to be yourself. Our tools for the face, eyes, and nails are everyday essentials elevated through function, form, or and material (but still amazingly affordable)
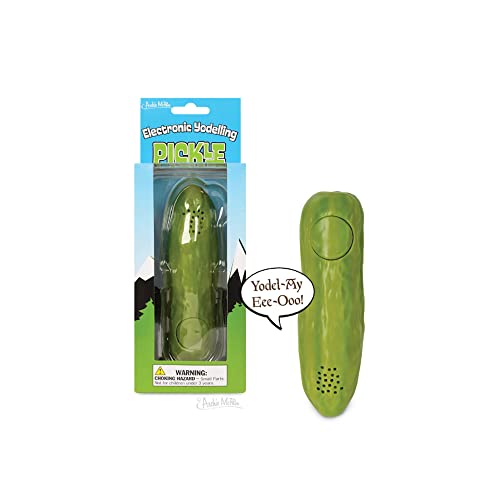
Archie McPhee Yodeling Pickle: A Musical Toy, Fun for All Ages, Great Gift, Hours of Mindless Entertainment
- Hours of mindless entertainment
- Batteries included
- Great gift for the person who has everything except a yodeling pickle
- Hours of mindless entertainment
- Batteries included
- Great gift for the person who has everything except a yodelling pickel
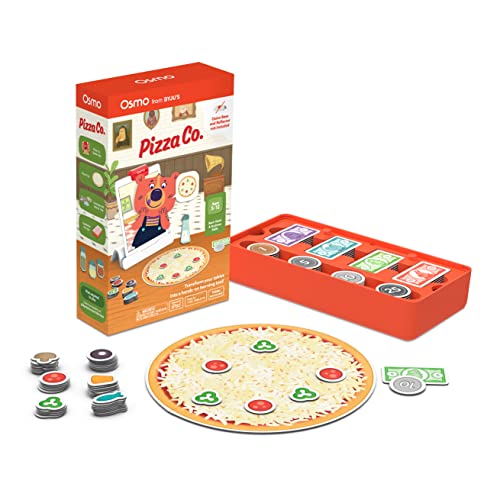
Osmo - Pizza Co. - Communication Skills & Math - Age 5 to 12 - Educational Learning Games - STEM Toy - Gifts for Kids, For iPhone, iPad or Fire Tablet, Age 5 6 7 8 9 10 11 12 (Osmo Base Required)
- Actual product packaging may vary from the image displayed. Components within the box remain the same. OSMO IS MAGIC: Fun-filled & award winning learning games. Children interact with actual hand held pieces & an iPad or Fire Tablet, bringing a child's game pieces & actions to life (No WiFi necessary for game play). Osmo Base and iPad/Fire Tablet not included, required for game play.
- TEACHING: Make pizza for customers, collect payment & make change (dollars/coins), & learn the profitability of your business. Additional game concepts include: Addition, Subtraction, Fractions, mental math, design and communication skills (Pizza Co.).
- SKILLS LEARNED: Real-world (business) math, money, addition, subtraction, fractions, fast paced mental math, run & grow a business, social interaction, listening, critical thinking, oberservation, creative problem solving & basic business concepts. Osmo sees and reacts to every real-life move. Geared towards children & love of learning.
- AGE & CAPABILITY: Ages 5-12+. Game is designed for beginner to expert levels. Osmo enables the continuation of learning. Real-time audio and visual feedback lets children learn through experimentation in a stress-free environment.
- WHAT'S IN THE BOX: Pizza/Tray, Toppings, Money tiles, Stackable storage for game pieces & 1 Game App: Pizza Co.
- COMPATIBILITY FOR IPAD: All iPads except Gen 1-4, Air Gen 1, iPad Mini Gen 1-3. The new iPad 10th Gen, iPad Pro 11" (4th Gen), & iPad Pro 12.9" (6th Gen) are not compatible; compatibility coming later in 2023. iPad Reflector 2021 required for: iPad Mini 6, iPad Air 4-5, iPad Pro 11-inch (Gen 1-3) & iPad Pro 12.9-inch (Gen 3-5). The min iOS version needed is iOS 15. COMPATIBILITY FOR IPHONE: iPhone 12, 12 Pro, 12 Pro Max, 13, 13 Pro, 13 Pro Max, 14, 14 Plus. No other iPhones are compatible. Requires the Osmo iPad base & 2021 reflector hardware. The min iOS needed is iOS 14.0.
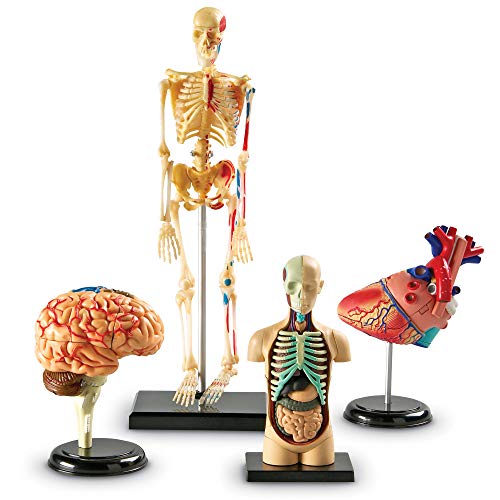
Learning Resources Anatomy Models Bundle Set, Brain, Body, Heart, Skeleton, Classroom Demonstration Tools, Teacher Accessories, Grades 8+, Ages 3+
- HUMAN BODY MODEL FOR KIDS: This miniature set measures, when assembled - Heart Model 5 inches, Brain Model 3 3/4 inches, Body Model 4 1/2 inches, Skeleton Model 9.2 inches
- SET OF FOUR: Set of four Anatomy Models
- HEART PUMP MODEL AND MORE: Gain a deeper understanding of how organs and systems interact by manipulating them yourself
- REALISTICALLY DETAILED: Four realistically detailed miniature plastic models (heart, brain, human body, and skeleton).FACTS & ASSEMBLY INSTRUCTIONS INCLUDED: Each set includes facts, step-by-step photo-illustrated assembly instructions, and display stand - 132 total pieces
- Get ready to explore the wide world around you with science discovery toys and tools that help kids build observation and critical thinking skills used by real scientists, school supplies,teacher supplies!
- GIVE THE GIFT OF LEARNING: Whether you’re shopping for holidays, birthdays, or just because, toys from Learning Resources help you discover new learning fun every time you give a gift! Ideal gift for Halloween, Christmas, Stocking Stuffers, Easter or even for Homeschool.

Good Morning Merch Poster - Motivational Wall Art - Positive Inspirational Quotes Bathroom Wall Decor - Uplifting Encouragement Gifts for Women, Men
- 8x10 UNFRAMED PRINTS - NOT Canvas or Tin Sign
- UNIQUE WALL ART DECOR - Cool original home decorations for office, living room, bedroom, bathroom, family room, man cave, dorm, dining room, kitchen, classroom, apartment, bar, baby nursery
- PERFECT PRESENT FOR EVERY OCCASION - Cute gift ideas for women, wife, girlfriend, her, girls, daughter, men, guys, boys, son, husband, boyfriend, him, kids, teens, best friend, cat lover, Christmas, Xmas, holiday, Halloween, housewarming, cheap inexpensive gag gifts, presents, bridal shower, wedding, birthday, anniversary
- SO MANY STYLES! Boho, bohemian, abstract, aesthetic, mid century modern, minimalist, contemporary, black art, African American, goth, gothic, pagan, country, rustic, vintage, shabby chic, farmhouse, typography, positive quotes, inspirational, motivational, Zen, religious, Christian, funny sayings, nautical, tropical artwork, beach, arte decoracion, retro, encouragement, glam
- SAVE ON MULTIPLE POSTERS, PRINTS, PHOTOS, PICTURES - See details at left
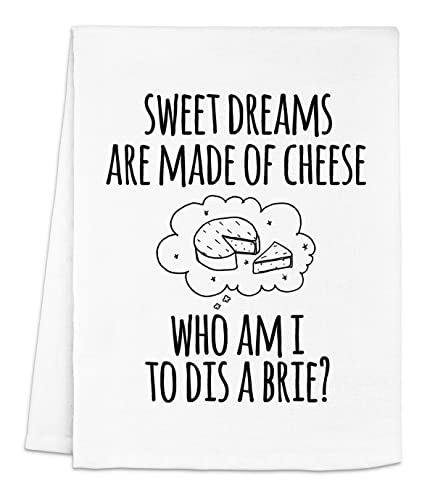
Funny Dish Towel, Sweet Dreams Are Made Of Cheese Who Am I To Dis A Brie? Flour Sack Kitchen Towel, Sweet Housewarming Gift, White
- BRING HUMOR TO ANY HOME SETTING. Friends and family will laugh when they see this funny dish towel hanging in your kitchen or bathroom. Our absorbent farmhouse towels are perfect for wiping off hands in the bathroom or making you giggle while you dry the dishes.
- SUPER SOFT & ABSORBENT. Our funny hand towels are crafted with 100% premium cotton flour sack material, making them as comfortable as they are effective at drying. After a couple washes these kitchen towels will be softer and even more absorbent!
- A FUNNY TOWEL WITH SERIOUS VERSATILITY. These absorbent hand towels can be used all around your home to wipe things down, dry your hands, and protect your countertops from hot pots and pans.
- DESIGNED & CRAFTED IN THE USA. Moonlight Makers dish towels are hand-crafted in Asheville, North Carolina and made with ethically-sourced, non-toxic materials. We’re dedicated to helping you bring joy home and spread laughter to all your loved ones!
- DISH TOWEL DETAILS & DIMENSIONS. Unfolded Size: 28” x 28”. Screen printed on 100% cotton flour sack materials with original Moonlight Makers designs and non-toxic inks.
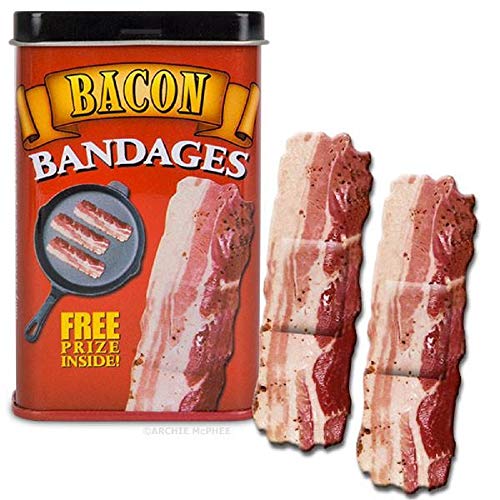
Accoutrements Bacon Strips Bandages
- Each tin contains fifteen bandages
- Each bandage measures approx. 3" L x 1" W
- Each tin contains a bonus trinket
- This is a fully authentic Accoutrements, Archie McPhee product
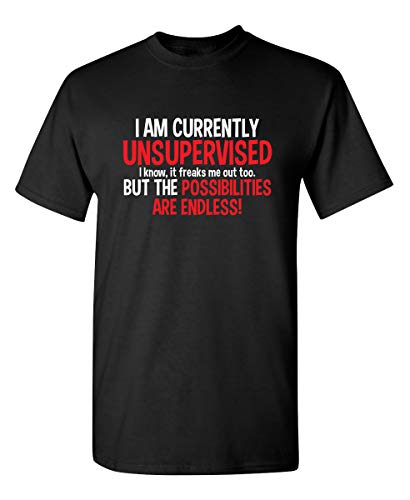
Currently Unsupervised Novelty Graphic Sarcastic Funny T Shirt XL Black
- AWESOME FIT: Fits True to size, great fit and feel - Wash with cold water, inside out. Want to make dad look like a super star? This shirt has a great look and cool fit. This men's funny t shirt fits great and is great for men, teenagers and kids. Nothing beats a t shirts for a gift. Currently Unsupervised. Makes A Great present for someone special.
- TOP QUALITY: Our Graphic Tees Professionally screen printed designed in USA by Feelin Good Tees. Nothing beats our selection of funny sarcastic tshirts! It will make great father's day gifts, birthday present, friend gift, dad gifts, Christmas gift. This is a great mens t shirt. Everyone needs a little humor and sarcasm.
- GREAT FEEL: Our Shirts are 100% preshrunk cotton exceptions; AshGrey is 99/1cotton/poly; SportGrey is 90/10cotton/poly if available. Available in 2XL,3XL,4XL,5XL Tee will bring adult humor out. The sarcasm laughs will flow. Graphic tee makes gift for dad. Great gift idea for teenagers, boys and girls, dads, uncles and best friends.
- HAVE FUN: Get your humor on with this fun tee. The best funny tshirts. Sarcastic and novelty in one tee shirt. Birthday tshirt best cotton tee. Great ice breaker. Love the soft feel probably wear it day and night nothing beats tshirts you can sleep in. This cool and stylist t shirt is professional printed.
- MAKES GREAT GIFT: See all our funny tees! Graphic tee makes best gift idea. Christmas, Fathers Day, Mothers Day, gift friends, brother/sister. Welcome home gift. Long lasting tees wear to party movie and all year. Perfect for back to school or a Christmas gift. Gif them something they will wear all year long. Make sure its a Feeling Good Tees.
Related Products:
- Forces For Dummies
- Porter’s Five Forces For Dummies
- London Dispersion Forces For Dummies
- Intermolecular Forces For Dummies
- Fundamental Analysis For Dummies
- Fundamental Analysis For Dummies Review
- Fundamental Attribution Error Definition For Dummies
- Fundamental Analysis For Dummies Matt Krantz
- Fundamental Analysis For Dummies Book
- Articles Of Constitution For Dummies
- Accounting Articles For Dummies
- Fundamental Theorem Of Calculus For Dummies
- Fundamental Theorem Of Algebra For Dummies
- Articles Of Impeachment For Dummies
- Biology Articles For Dummies
Last update 2021-09-03. Price and product availability may change.